Tuesday, August 26, 2014

Timing is Everything


Timing is Everything


Although I did not get to carry the Oklahoma flag again in the ACU Parade of Flags like I had originally planned, I ended up getting a paid internship with University Events instead.

 Recently I have been reminded in a couple situations how timing is everything. Last year at school I would check ACU’s on-campus job listings about once a month. Not hardcore looking for a job, but trying to apply for any that had openings. I figured what would work out would. Looking back, having a job last year would have been too overwhelming. This semester with social club rushing and pledging, I took a lighter load of classes. After talking to someone who had an internship on campus I thought that there must be more opportunities for an internship. By chance, I emailed University Events asking if they had any opportunity or could help direct me to a similar internship or job. I chose to email University Events because I thought something similar would cater to my strengths and be something I could look into and gain experience for a potential career. Like it was destined to happen, as of the day I emailed them they had an opening. I had an interview within the next few days. I could not have asked for a better interview and was put on a trial basis. Over the weekend I helped plan and organize one of ACU’s longest traditions, Opening Ceremonies. I have loved Opening Ceremonies since last year when I carried the Oklahoma flag in the Parade of Flags. Being a part of the process of setting up and taking down everything needed for the event was a lot of work, but it was worth it because of the tradition and principle of the ceremony. Today, a week after I sent my original email, I was officially offered the internship.

It is crazy how God worked in this situation the past week. There is no other explanation I even imagine that could explain how this opportunity presented itself. Although waiting on God’s timing can be frustrating or tedious, it is worth it. Before moving back to school I could never have imagined getting a job on campus, especially one interesting and relevant to a potential career. I am thankful for this opportunity and excited to work hard this semester and see where I am led in all activities I am involved in. So here’s to a new semester and new opportunities and more waiting on God’s timing.


Your Favorite Redhead

Tuesday, August 12, 2014

Tackling the dorm room and all of its glory


Tackling the dorm room and all of its glory

My dorm room freshmen year at Abilene Christian


Depending on the school you attend can determine your general feelings about dorm rooms. Dorm life may not be super glamorous, but it is fun. I actually enjoyed living in the dorm freshmen year which is good because my school requires us to live in the dorms freshmen and sophomore year. As I am getting ready for year two, I am remembering how slightly overwhelming it was figuring out what I needed to pack last year. Before moving to college I had never moved before. Just the thought of packing up my life into my car (and my mom’s car) still kind of scares me. The great part though is that what is waiting at the other end of a car trip is far better than staying home in my comfort zone. While there are many posts and list on what to pack for college, these are a few tips, tricks, and thoughts on dorm life from someone who has been-there-done-that.

Research. Odds are if you are reading this you are interesting in this and applying it. Even though I have already moved into and out of a dorm previously, it is almost calming looking at posts and list again preparing for round two. Since it’s been a year from the last time I’ve moved into the dorms, recalling what I did last year is a little tough. Looking at different blogs and pins on Pinterest is a helpful tool. It is also calming for someone slightly OCD like me. It is also useful to remember small things like to not over pack and such. Take advantage of the different tools available through the internet and use them to your advantage. Never having moved prior to college, this was how I began to configure how I was going to pack everything.
Start early. If you’ve started to research, odds are you’ve started early too. Before freshmen year I think I was so excited I was packed three weeks early, but that’s a little extreme and unnecessary. After you are done researching begin to make your own list and start devising a plan with your roommate on what all you will need. You will also need to look at your school’s dorms to determine what you will need and what is allowed and not allowed. All of this takes time, being a great reason to start early. Starting early will also take some stress away as move in day approaches.
Be organized. Being an overly organized individual, organization is one of my favorite things. Disorganization drives me insane. So naturally I felt the need to organize everything as best I could. It is important to remember that you can be the most organized individual, but moving into a dorm will be organized chaos. So have a plan, but be flexible. Going into move in day mom and I devised a plan to move everything in. When we got there we ended moving everything completely different than we originally planned and it all still went smoothly. A few tips will help with this.
1.       Especially if you are going to a larger school, label everything with your name and room number. This will help if something gets separated. Normally there is a move in crew there to help and it makes it easier to label everything so you avoid losing anything.
2.       Have an idea of how much you have. Again things can get mixed around and many people around. After everything is moved in, taking an inventory of your items to ensure they made it to your room is a good idea. This way you can track down any missing items.
3.       Pack your car in a strategic manner. You will most likely not have much control on what arrives to your room when. Bulkier items can be put into the car first and more delicate items will need to go in last. Use items you will already be bringing to protect everything. Use towels, blankets, bedding, etc. to protect items that could get broken.
Pack strategically. This could help you be able to pack more efficiently and effectively, especially if you are tight on space. Ditch boxes unless you have items that are new and still in the package or absolutely need to travel in a box. Instead, use duffel bags that can fold and either be stored easily or go home with mom and dad. Duffel bags are great because you most likely have them sitting around and you can use them when you go home next. Packing your items in bags you already have or are going to be using in your new home is the best way to pack. So if you are going to be bringing extra storage for your room use it to pack. I have an ottoman that was reupholstered and normally I use it to store my extra blankets, but when moving I use it to transport picture frames and decorations. It’s great because it holds a lot and protects delicate items, like picture frames. Items like my ottoman can be helpful space savers.
Unpack. Yes it sounds silly, but make an effort to unpack as much as you can the day you move in. Although you may think you will unpack within the first few days you are at school, odds are you won’t. If you wait to unpack you will lose interest and probably end up putting everything under your best or stuffing it into the closet. Unpacking the day you move in is also a good idea because you will most likely have people that can help you unpack. Really though, you will get busy and lose motivation. Unpack when you move in.

While the thought of college and moving and dorm life can be overwhelming and possibly confusing, I hope these tips can help the process. The biggest thing to remember on move in day is that it is only a day. The day after move in day is when the real fun will start.


Your Favorite Redhead


Saturday, August 9, 2014

Extreme Chair Makeover: An Adventure in Reupholstering

Extreme Chair Makeover: An Adventure in Reupholstering


When my dad was in college, he had to take a class where he reupholstered a chair. Having experience in upholstery, when mom and I decided to take on this project we ask him if he had any advice for us. His advise was to take it to someone and not do it yourself. While mom and I did not know what we were getting ourselves into, we managed to successfully give these chairs a facelift. The chairs we reupholstered used to be my grandparents. They were in good shape for being previous residents of our attic.

The first obstacle we faced was finding the fabric we wanted to use. We went back and forth on this because we had trouble finding fabric that was vibrant and the quality fabric we needed for the job. After not having any luck finding the fabric we were looking for, we took a leap. We had seen fabric from Amy Butler's Love collection that we kept going back to; the problem was that it was not upholstery fabric. Having used Amy Butler fabric many times before we knew it was a high quality quilting fabric. Despite not being a true upholstering fabric, we decided to use it anyways. To reenforce the fabric interfacing was ironed to the fabric to give it a little extra support. It might not last as long as a true upholstery fabric would, but for what we want now it worked great.

Before the process began it is important to have the necessary tools and supplies. Some you will find out as you go; each chair will have its own quirks. Even though both of the chairs we were upholstering were identical, they had slight differences as we took them apart. As you take apart the chair carefully label little parts like cardboard pieces and fabric pieces as well. This was you can know if you need to replace them or reuse them. This will depend on the condition of the chair. Taking pictures as you go will also be helpful to remember how the chair should be put back together. It is important you are up to date on your tetanus shot and also have safety goggles. I did not have much trouble with the bleeding part, but mom left her mark at almost every major stage of the process. The goggles are a good idea to be on the safe side. Investing in a staple gun that attaches to an air compressor is also a good idea. Your hands will thank you. The most valuable took mom and I used for task such as getting fabric into crevasses to a back scratcher, was a cake spatula. Normally, this kind of spatula is used to spread icing on cake, but it had many purposes for us; this was truly the greatest idea we had during this project.

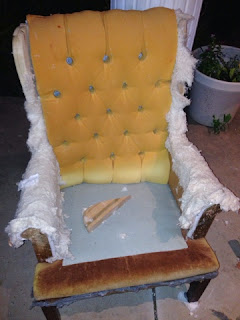
This is what the chairs first looked like. They are pretty old and had been in out attic for a while, but in good shape.
The first step was to label each part of the chair. By labeling the pieces before we took the chair apart, we were able to later have a pattern for the new fabric. The abbreviations can be anything that you can remember. Also remember to include an arrow so you know which part is the top.
We then began to take the chair apart by starting at the bottom. From this point on, you take apart the chair based off of each chairs quirks. What I mean by this is that we had two identical chairs and they both had been originally upholstered differently. So depending on the chair will determine how the following steps occur. To take the staples out of the chair we were using pliers and screw drivers. Between mom and I we had two of three different sized screw drivers and needle-nose pliers.   
Next, we took the back piece of fabric off of the chair.
Moving to the arm of the chair, these buttons were the next to go. They popped right off with the help of a screw driver.
The decorative buttons that you just took of are there more or less as decoration and to cover staples. Take the staples out that were being covered and then take the piece of fabric off. There will be multiple layers that will need to be taken off.
After taking the front part of the arm off we moved to the side of the chair/arm.
Any pieces of cardboard, metal or cardboard stripes that you may run into save and label. Saving and labeling them can be useful if the pieces can be reused or to know what materials may be needed.
To continue taking the original fabric, the chair may need to be turned onto its side. The next part to take off will be the outside of the wing of the chair.
Metal pieces like these can be found at the top part of the wing of the chair. Save them to reuse when putting on the new fabric.
After both sides of the wings are taken off, take of the center front cushion piece. 
When able, take of the cardboard piece on both sides.
Here you should be getting close to the bare wood of the chair.
After taking off the original upholstery, take off the batting that was between the wood of the chair and the fabric.


 After taking off all of the original upholstery, we then covered the chair in an upholstery foam. We used an inch thick foam on the inside part of the chair and a half inch foam on the outside. Later the foam was covered in batting. The batting also gives a smother look to the chair when putting on the new fabric to the chair. 
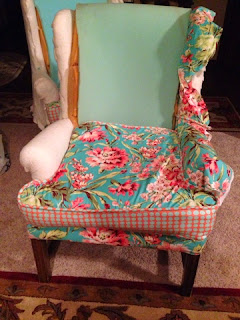
The first piece of new fabric we put on the chair was the bottom front piece shown. We left the original part with the old fabric on because it was in good shape and covered it. The floral fabric was sewn to white fabric that covers the part of the chair under the cushion.  
Mom then made the cushions. The process for the cushions is similar to how a pillow would be made.
To begin to cover the chair with the new fabric, we began with the arms. The new fabric was cut using the old pieces that had been labeled and taken off earlier. They were cut larger than original piece to be sized down later.The first piece we covered was the inside of the arms.

After attaching the inside of the arm, we stapled the cording to the chair. The cording was stapled from the top of the chair to the end of the arm.
Once the cording was stapled, the top part of the arm was put on. After the top of the arm was put on the part under the arm was put on. The cardboard strips were used to get a straight line with the fabric.
At this point, we had the front, back, and bottom left on the chair. Before putting the remaining fabric left onto the chair, we covered the front with batting.
We put the front piece of fabric on the chair. Since we were doing two chairs we compared them to see of the fabrics prints matched each other. Also when the fabric was cut we did our best to match the pieces with the print. The fabric we used is busy enough this was not a huge concern, but with other fabrics it can be more of an issue. To get the fabric where it needed to be the cake spatula was VERY useful here.
While this chair looks complete, we still had some more work left...
The piece of the chair was put on with this contraption. Starting at the top we got the fabric with the teeth into the chair and then used a mallet to secure it.
Now all of the chair was covered in the new fabric. To give it a cleaner look we stapled cording to the bottom it the chair to cover it.
Again to give it a cleaner look and cover the bottom of the chair, we used a duck cloth on the bottom. 
The last step was covering the raw edges on the front portion of the arm. To do this we cut the piece bigger than the original one was and then hot glued cording to it. We then glued a piece of cardboard to the back with tacks used on back piece of fabric between the fabric and cardboard. With upholstery glue on the cardboard. We put it on the chair and used a mallet to secure it. On the curve of the piece we put some hot glue to keep it in place.
After letting everything dry this was the final result!
Three weeks, blood, sweat, and fears we would never finish later the transformation was complete.
Mom and I are happy with how they turned out and glad to be finished! Upholstery is an adventure and while it comes with hard work it is possible.


Your Favorite Redhead